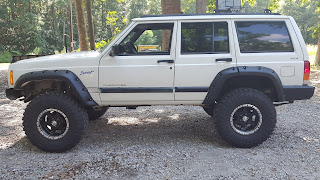
With the past 4th of July Weekend, I took 5 days off, actually 2 days off to make the 5 day total, we did a fender flare upgrade to the XJ. The stock flares did ok with the 33" tires, but I did get some rubbing when I turn and articulated the front suspension. I went to Summit Racing (not liberal Amazon that amateur prepper's promote on their 4th or 5th website to make a few pennies because they quit college) and found a set of Rugged Ridge Flares at a decent price. I had a VA C&P appointment in Columbia on June 30th and me and the boys started that afternoon after I got home.
 |
| Before |
First thing we did was to take the stock flares off. I will put this out there, all the stock hardware that held it on snapped off when using a 10mm ratchet and it all came off without a glitch. We removed the wheel well inserts (save them because you will need to put them back in, if you want too, I did.) You will also have to take off the stock front bumper caps, which was easy as well.
Following the supplied instructions and laying out our cut lines, we started the cutting.
I tend to use step drill bits over a normal drill bits and here is the reason why. The drivers side front fender has the windshield washer reservoir tank right behind it and above the wheel well inserts. I didn't want to puncture the tank with a long drill bit. I used the first increment of the bit, a 3/16th. After fitting the front fender up and marking our holes to drill, we started drilling.
Using the supplied Allen bolts, washers, and rubber spacers we put on both front fenders.
 |
| Passenger side |
With the front done, we proceeded to the rear fenders and just like the front stock flares, we had no issue getting them off. This is the part when things got confusing with the supplied instructions. This is the cut line that was explained in the instructions and it matched up with the picture but here is the problem. XJ's are uni-body vehicles and by following this line, I had the possibility of cutting the factory welds for the body and separating it. I would highly suggest doing what I did by taking a Sharpie pen and marking the factory weld points for the Uni-body as I did with a blue marker. What I ended up doing was cutting the metal off along the bottom ridge then cutting vertical slots to bend the metal up into the fender well.
 |
| Vertical cuts up to where the two body parts meet |
 |
| NW and I attaching the 1st part of the rear flare. |
Once they were all on, we got the hell out of the heat and sun for the rest of the day.
NW's birthday was that Monday and I spent the day with him, just him and I. We made a trip to some local stores (Dicks Sporting Goods and Cabelas) along with a stop for lunch. When we got to Cabelas we walked the whole store just looking and letting him find something that he would like for his birthday. We ended up at the knife section and he said, I would like a new knife. We looked and looked and then he found this one.
As we continued to walk around, I told him, lets see if they have a holster for my Ruger SP101. While in the holster section, I was unable to find one specific for the SP101 but I found this one.
 |
| As you know already, I really like De Santis holsters. |
I told NW, lets take this holster over to the handgun counter and see if they has a SP101 in 2 1/4" barrel and lord behold they had one. I explained to the store employee what I was wanting to do and he took the 101 out of the case and it fit perfect. With my son and I happy with our finds, we went to checkout out. I did find an actual SP101 holster made by De-Santis online and it was $20 more than the one I bought.
Well time to go. Haven't decided what upgrade to do next for the Fouled XJ, maybe a Roof Rack, Front bumper with winch, rear bumper, who knows. Hope everyone has a good weekend and keep prepping because Amazon wont save your ass when SHTF!!!!
Senior


